Entering a capstone project is a significant milestone in your academic and professional journey. It is the moment where abstract knowledge transforms into tangible results. For students and developers in object-oriented programming, the class diagram serves as the architectural blueprint. It defines how data and logic interact before a single line of code is written. This guide walks you through the practical application of class diagram concepts, ensuring your capstone project is built on a solid foundation.
Many learners understand the theory of Unified Modeling Language (UML) in isolation. They know what a box represents and what an arrow signifies. However, bridging the gap between a textbook diagram and a functional software system requires a different mindset. This article provides a structured approach to designing, validating, and implementing class diagrams specifically tailored for capstone-level complexity. By following these steps, you ensure your design is scalable, maintainable, and logically sound.
Why Class Diagrams Matter in Capstone Projects 💡
A capstone project is often evaluated on more than just functionality. Evaluators look for evidence of systematic thinking. A well-constructed class diagram demonstrates that you understand the relationships between components. It shows you are not just writing code, but engineering a system.
Without a diagram, code often becomes a “spaghetti” structure. Functions and variables become disconnected islands. A class diagram connects these islands. It clarifies:
- Encapsulation: Which data belongs to which class?
- Responsibility: What actions does a specific object perform?
- Interaction: How do different parts of the system communicate?
For your capstone, this documentation is not just paperwork. It is a communication tool. It helps you explain your logic to peers, supervisors, and future maintainers. It reduces the cognitive load required to understand the system later.
Core Elements: A Quick Refresher 🧩
Before diving into the design process, ensure your understanding of the fundamental building blocks is sharp. A class diagram is composed of classes, attributes, operations, and relationships. Let us break these down.
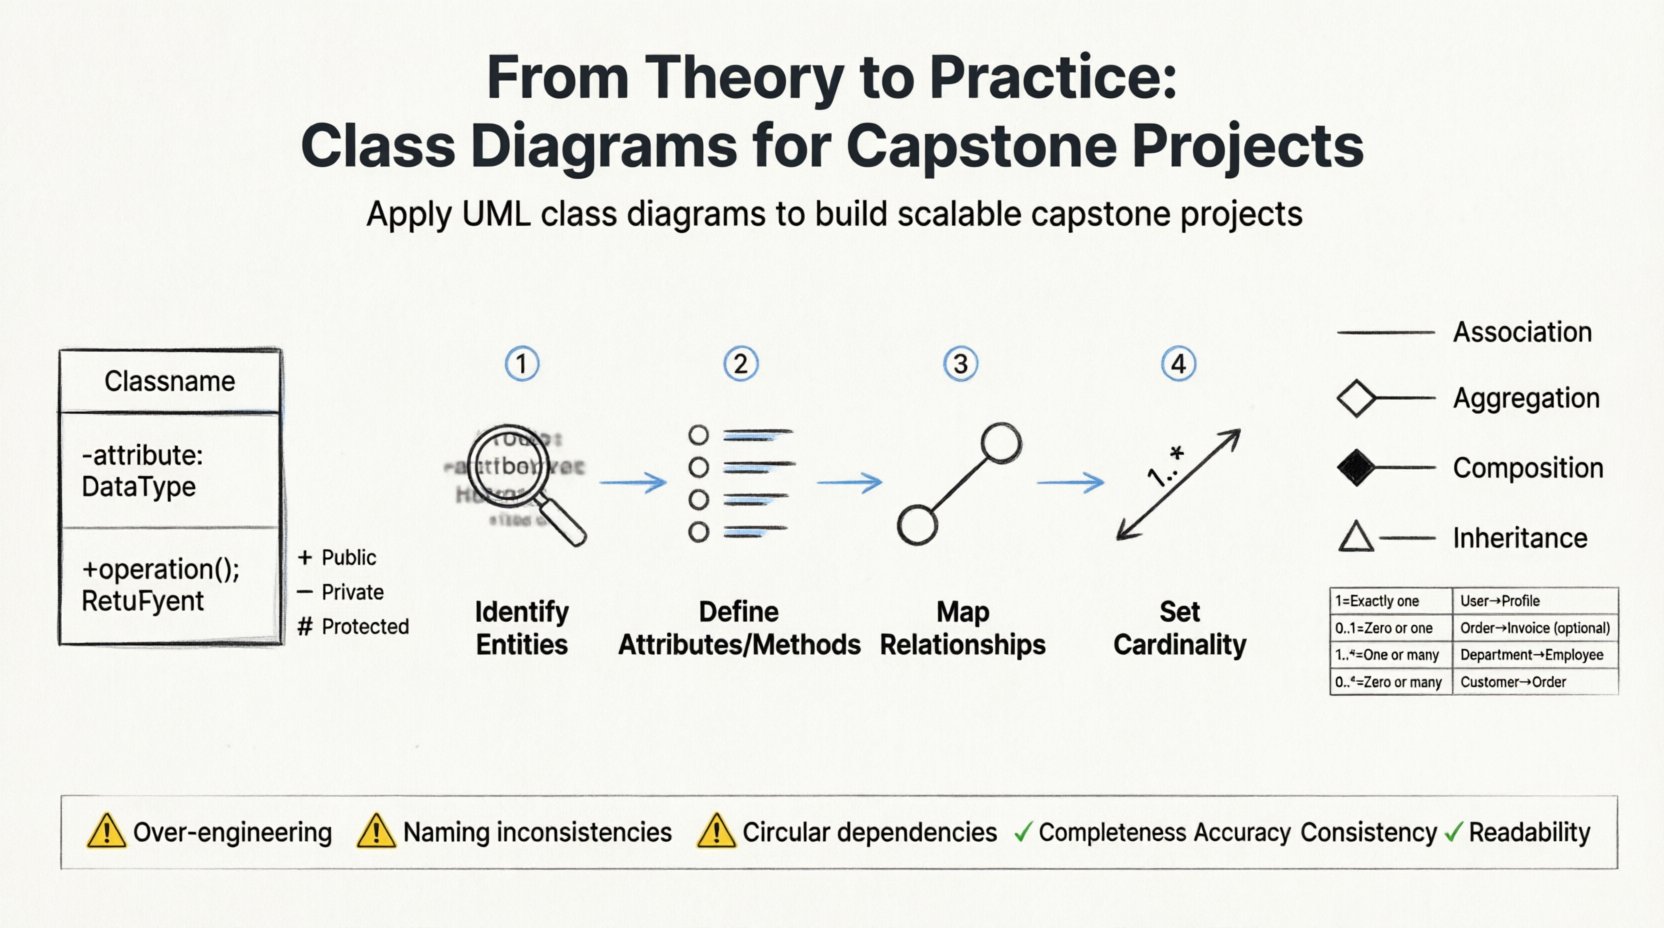
1. The Class
A class is a template or blueprint. In your diagram, it is represented as a rectangle divided into three sections. The top section holds the class name, the middle holds attributes (data), and the bottom holds operations (methods).
- Visibility: Use
+for public,-for private, and#for protected. Private is generally preferred for data to maintain integrity. - Name Conventions: Use PascalCase for class names (e.g.,
StudentRecord). Use camelCase for attributes and operations.
2. Attributes and Operations
Attributes define the state of an object. Operations define the behavior. In a capstone project, avoid listing every possible method. Focus on the core behaviors that define the class’s purpose. For example, a BankAccount class needs deposit() and withdraw(), but it does not need a print() method unless that is a primary function.
3. Data Types
Always specify data types in your attributes. Is it an integer? A string? A date? This detail is crucial when you move to the implementation phase. It prevents ambiguity during coding.
The Design Process: Step-by-Step 🛠️
Designing a class diagram is not a linear activity. It is an iterative process. You will refine the diagram as your understanding of the requirements deepens. Here is a systematic approach to applying these concepts to your capstone.
Step 1: Identify the Domain Entities
Start by reading your project requirements. Look for nouns. Nouns often represent potential classes. If your project involves an inventory system, your nouns might be Product, Warehouse, Supplier, and Order.
- Filter: Not every noun is a class. Remove generic terms like
SystemorManagerunless they hold specific data. - Context: Ensure the class fits within the scope of your project. Do not create a
GlobalUserDatabaseclass if your project only handles local authentication.
Step 2: Define Attributes and Methods
Once you have your list of classes, brainstorm what data each holds. Ask: “What information does this object need to function?”.
- Attributes: For a
Product, you might needid,name,price, andstockQuantity. - Methods: What can this object do? A
Productmight have a method tocalculateDiscount()orupdateStock().
Step 3: Map the Relationships
Objects rarely exist in isolation. They interact. This is where the diagram becomes powerful. You must define how classes connect. There are four primary types of relationships to consider:
- Association: A general link between two classes.
- Aggregation: A “has-a” relationship where parts can exist independently.
- Composition: A strong “has-a” relationship where parts cannot exist without the whole.
- Inheritance: A “is-a” relationship where one class extends another.
Step 4: Determine Cardinality
Relationships are not just yes or no. They are quantitative. How many objects are involved? This is expressed as cardinality.
| Notation | Meaning | Example |
|---|---|---|
| 1 | Exactly one | A Passport is linked to exactly one Person. |
| 0..1 | Zero or one | A Person may have zero or one Spouse. |
| 1..* | One or many | A Store has one or many Employees. |
| 0..* | Zero or many | A Store may have zero or many Shelves. |
Applying cardinality correctly prevents logic errors later. If you define a relationship as 1:1 but your code handles 1:N, you will face structural issues.
Common Pitfalls and How to Avoid Them ⚠️
Even experienced designers make mistakes. When working on a capstone, the pressure to finish can lead to shortcuts. Be vigilant against these common errors.
1. Over-Engineering
It is tempting to create complex hierarchies to show off knowledge. Avoid this. If a simple association works, do not force inheritance. A generic Vehicle class might seem useful, but if your project only deals with Car and Truck, and they have no shared logic, separate them. Keep the design simple.
2. Ignoring Naming Conventions
A diagram is hard to read if names are inconsistent. Do not mix userList with UserArray. Stick to one standard. This clarity helps you when you translate the diagram to code. If you cannot name a class, it is a sign you do not understand its responsibility.
3. Circular Dependencies
Ensure you do not create circular relationships where Class A needs Class B, and Class B needs Class A to function. This creates a deadlock during instantiation. If you see this, look for an intermediary class or restructure the design.
4. Missing Attributes
A class without attributes is often a code smell. If a class has methods but no data, it might be a utility class. Utility classes are fine, but they should be treated differently in your diagram. If it is a domain object, it must hold state.
From Diagram to Code: Implementation Strategy 🚀
The final stage is translating your visual design into executable code. This is where the theory meets practice. Follow these guidelines to ensure fidelity between your diagram and your source code.
1. Start with the Core Classes
Do not build the user interface first. Build the data model. Create the classes defined in your diagram. Implement the attributes first, then the methods. This ensures the backbone of your application is solid.
2. Enforce Visibility
Use the visibility markers from your diagram in your code. If an attribute is marked with - (private), do not make it public in the language you are using. This enforces the encapsulation you planned.
3. Validate Relationships
Check your code to ensure relationships match the diagram. If the diagram shows a one-to-many relationship between Student and Course, your code should reflect this using lists or collections, not a single reference.
4. Handle Inheritance Carefully
If you used inheritance, ensure the child classes only add specific behaviors. They should not override functionality that belongs to the parent unless necessary. This maintains the integrity of the base design.
Refining and Validating Your Design 🔍
Once the code is written, go back to the diagram. Does the code match the design? Often, during implementation, you realize a feature was missing or a relationship was too complex. This is normal. Update your diagram to reflect the reality of the code. A static diagram that does not match the software is worse than no diagram at all.
Checklist for Validation
- Completeness: Are all classes in the diagram present in the code?
- Accuracy: Do the method signatures match the diagram?
- Consistency: Are the relationships in the code the same as drawn?
- Readability: Is the code structure logical based on the diagram?
If you find discrepancies, document the changes. This shows adaptability, a key skill for capstone evaluations. It proves you can evolve a design based on feedback and testing.
Advanced Considerations for Complex Projects 🧠
If your capstone is particularly large or complex, you may need to extend your class diagram skills. Consider the following advanced patterns.
1. Abstract Classes and Interfaces
Use abstract classes to define a common structure for similar objects without implementing the logic immediately. Use interfaces to define capabilities that different classes can adopt. This helps in decoupling your system.
2. Static Methods and Attributes
Some data belongs to the class, not the instance. For example, a counter for total users. Represent these clearly in your diagram, often underlined or marked distinctly, to avoid confusion during coding.
3. Package Organization
Large projects have many classes. Group them into packages or namespaces. Your diagram can show these groupings using sub-boxes. This helps in managing the complexity and organizing your file structure.
Final Considerations 🌟
Applying class diagram concepts to a capstone project is about more than passing a grade. It is about developing the habit of design before coding. This habit saves time in the long run. It reduces bugs. It makes collaboration easier.
Remember that a diagram is a living document. It will change as you learn more about your requirements. Do not be afraid to redraw. Do not be afraid to delete a class that no longer fits. The goal is a system that works efficiently, not a diagram that looks perfect on paper.
By following the steps outlined here, you are equipping yourself with a professional workflow. You are moving from being a coder to being an engineer. This shift in perspective is the true value of your capstone project. Use these tools to build systems that are robust, clear, and maintainable.
Good luck with your project. Your future self will thank you for the time invested in planning.