Software architecture relies heavily on clear communication. Among the various tools available for this purpose, the class diagram stands out as a fundamental component of object-oriented design. It provides a static view of the system, illustrating classes, their attributes, operations, and the relationships between objects. However, a diagram is only as good as the discipline behind it. Without adherence to specific standards, diagrams can become confusing, misleading, or obsolete quickly.
This guide outlines five core rules designed to maintain integrity in your class diagrams. By following these principles, developers ensure that the visual representation aligns with the actual implementation, facilitating better collaboration and easier maintenance. We will explore how to structure relationships, manage visibility, and organize hierarchy to support long-term scalability.
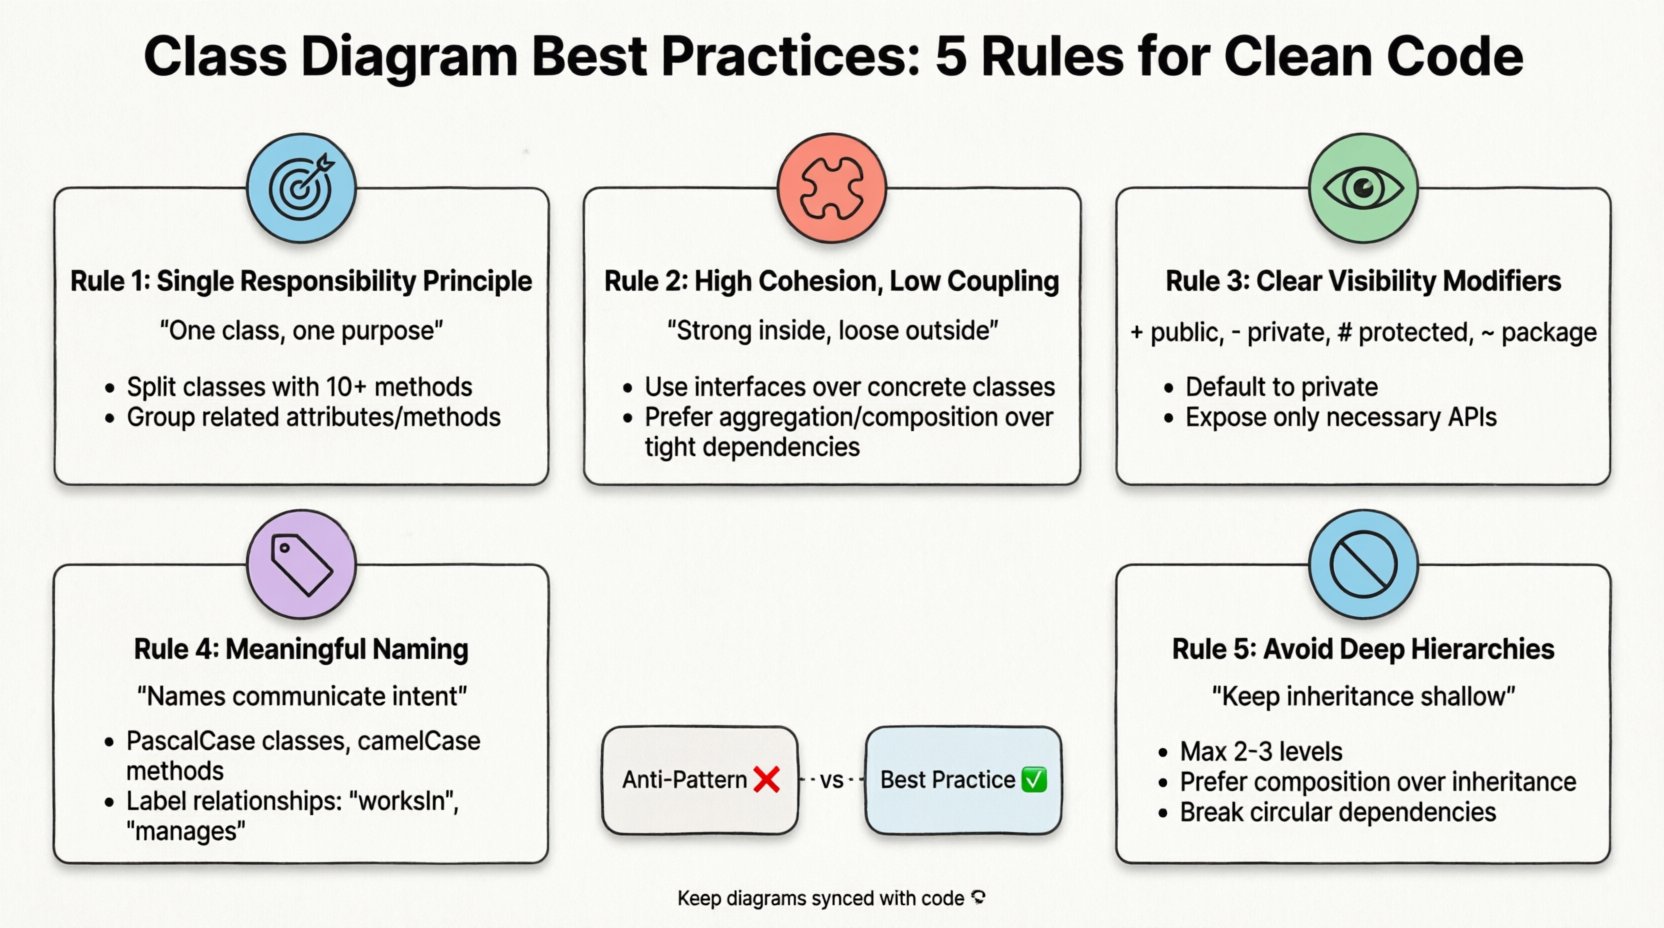
1. Adhere to the Single Responsibility Principle (SRP) 🎯
The foundation of a clean design is the Single Responsibility Principle. In the context of class diagrams, this means each class should have one, and only one, reason to change. When a class diagram shows a class handling data persistence, user interface logic, and business rules simultaneously, it signals a structural weakness.
- Why SRP Matters: Classes that do too much create tight coupling. If you need to modify how data is saved, you risk breaking the user interface logic because they reside in the same unit.
- Visual Indicators: Look for classes with an excessive number of methods. If a class has more than ten public methods, it is likely trying to do too much.
- Refactoring Strategy: Split large classes into smaller, focused units. For example, separate a
Customerclass intoCustomerProfileandCustomerAccountif they serve distinct purposes.
When drawing your diagram, group related attributes and methods together. If a method operates on data that belongs to another class, consider whether that method should be moved. This separation ensures that changes in one area do not cascade unpredictably through the system.
2. Maintain High Cohesion and Low Coupling 🧩
Cohesion refers to how closely related the responsibilities of a class are. Coupling refers to the degree of interdependence between software modules. A robust design maximizes cohesion within classes while minimizing coupling between them.
Understanding Relationships
Relationships in a class diagram are not just lines; they represent dependencies. Different lines indicate different types of connections:
- Association: A standard relationship where objects are linked. (e.g., a
Driverdrives aCar). - Aggregation: A whole-part relationship where the part can exist independently of the whole. (e.g., a
DepartmenthasEmployees, but if the department closes, employees remain). - Composition: A stronger form of aggregation where the part cannot exist without the whole. (e.g., a
HousehasRooms; if the house is demolished, the rooms cease to exist). - Inheritance: An
is-arelationship. (e.g., aSedanis aVehicle).
Reducing Coupling
High coupling makes systems fragile. If Class A depends heavily on the internal implementation details of Class B, a change in B breaks A. To reduce this:
- Use Interfaces: Depend on abstractions rather than concrete implementations. The diagram should show the interface as the point of connection, not the class itself.
- Dependency Injection: Avoid creating dependencies directly inside classes. Instead, pass them in via constructors or methods.
- Limit Scope: Keep the visibility of relationships tight. If a class interacts with five other classes, consider if it needs to know about all of them.
A diagram with long chains of dependencies spanning across the page often indicates high coupling. Aim for clusters of related functionality that interact minimally with distant clusters.
3. Define Clear Visibility and Access Modifiers 👁️
Visibility modifiers dictate who can access the members of a class. In a diagram, these are crucial for understanding encapsulation. Hiding internal implementation details prevents external code from making assumptions about the class structure.
| Modifier | Symbol | Accessibility | Best Practice |
|---|---|---|---|
| Public | + | Accessible everywhere | Use for API endpoints or entry points. |
| Private | – | Accessible only within the class | Default for internal state and helper methods. |
| Protected | # | Accessible within class and subclasses | Use sparingly for inheritance needs. |
| Package | ~ | Accessible within the same package | Use for internal module collaboration. |
When creating your diagram, ensure every attribute and method has a defined visibility. Omitting this information creates ambiguity for developers reading the model. If a field is private, it should not be directly manipulated by other classes; interaction should occur through public methods (getters and setters, or specific business methods).
Overusing public visibility is a common anti-pattern. It exposes implementation details that may change later. By marking data as private, you protect the integrity of the object. The diagram should reflect this protection, showing only the necessary public interface to the outside world.
4. Enforce Meaningful Naming Conventions 🏷️
Naming is the most overlooked aspect of design. Ambiguous names lead to confusion and errors. A class diagram is a communication tool; if the names are unclear, the communication fails.
Class Names
- Noun-Based: Classes represent nouns (e.g.,
User,Order,Invoice). - PascalCase: Use PascalCase for class names to distinguish them from variables.
- No Abbreviations: Avoid
USforUserorIDforIdentifierunless it is a universally recognized standard in your specific domain.
Method and Attribute Names
- Verb-Based: Methods represent actions (e.g.,
calculateTotal,saveRecord). - CamelCase: Use camelCase for methods and attributes.
- Avoid Generic Terms: Terms like
process,handle, ordoprovide no context. Instead, useprocessPaymentorhandleLoginAttempt.
Relationship Names
Do not leave relationship lines unnamed. If a Employee is linked to a Department, label the line with a verb like worksIn or manages. This clarifies the direction and nature of the relationship without needing to read the code.
Consistency in naming across the entire diagram reduces cognitive load. If you use getUserById in one class, do not use fetchUser in another for the same operation. Standardization helps maintain the diagram as the project grows.
5. Avoid Deep Hierarchies and Cycles 🚫
Complex inheritance trees are difficult to understand and maintain. A deep hierarchy (e.g., Class A extends B, which extends C, which extends D) creates a fragile system where a change at the top affects everything below.
Managing Inheritance Depth
- Limit Depth: Try to keep inheritance chains to two or three levels maximum.
- Interface Over Class: Use interfaces to share behavior without forcing a class hierarchy. This allows a class to adopt multiple capabilities without becoming a complex hybrid.
- Composition Over Inheritance: If Class A needs functionality from Class B, consider having A contain an instance of B rather than inheriting from B.
Preventing Cycles
A cycle occurs when Class A depends on Class B, and Class B depends on Class A. While some circular dependencies are unavoidable (like in database entities), they should be minimized.
- Identify Loops: Trace the lines in your diagram. If you can start at a class and follow the relationships back to itself, you have a cycle.
- Break the Chain: Introduce an interface or an abstract base class in the middle to break the direct link.
- Lazy Loading: In implementation, ensure that objects are not initialized immediately if they create a circular dependency.
A diagram with many crossing lines and loops often indicates a design that is hard to test and refactor. Aim for a structure that flows logically from top to bottom or left to right.
Common Anti-Patterns vs. Best Practices 📊
To help visualize the differences, here is a comparison of common mistakes against recommended practices.
| Feature | Anti-Pattern | Best Practice |
|---|---|---|
| Class Size | One class handles everything. | Multiple small, focused classes. |
| Dependencies | Direct instantiation of concrete classes. | Dependency on interfaces/abstractions. |
| Visibility | All fields are public. | Fields are private; access via methods. |
| Names | temp, data, obj. |
userData, customerRecord, invoice. |
| Inheritance | Deep multi-level trees. | Flat hierarchy with composition. |
Maintaining Diagram Integrity Over Time 🔄
A class diagram is a living document. As the code evolves, the diagram must evolve with it. If the diagram falls out of sync with the code, it becomes documentation debt. Developers will stop trusting it, and it loses its value.
Strategies for Synchronization
- Code-First Approach: Generate diagrams from the codebase periodically. This ensures the visual model matches the current reality.
- Design-First Approach: Update the diagram before writing new code. This enforces discipline during the design phase.
- Automated Checks: Use tooling to flag when code changes violate the diagram structure, such as adding a new dependency not reflected in the model.
Documentation Context
A class diagram should not exist in isolation. It needs context. Include a legend explaining symbols used. Add a brief description of the system’s domain within the diagram file. This helps new team members understand not just the structure, but the business logic behind it.
The Cost of Poor Diagramming 💸
Ignoring these rules incurs a tangible cost. Technical debt accumulates when the design is unclear.
- Onboarding Time: New developers spend weeks deciphering a messy diagram instead of contributing immediately.
- Bug Frequency: Misunderstood dependencies lead to unintended side effects when changes are made.
- Refactoring Resistance: If the structure is tangled, developers avoid changing code, leading to stagnation.
- Communication Gaps: Stakeholders cannot understand system capabilities if the architecture is opaque.
Iterative Refinement Process 🛠️
Design is rarely perfect on the first try. Treat the class diagram as a draft. Review it regularly during sprint planning or architectural review meetings.
- Review: Look for classes that violate the rules outlined above.
- Discuss: Present the diagram to peers. Ask if the relationships make sense.
- Refactor: Update the diagram to reflect improvements.
- Validate: Ensure the updated diagram aligns with the code changes.
This cycle ensures that the design remains relevant. It turns the diagram from a static artifact into a dynamic tool for improvement.
Final Thoughts on Design Discipline 💡
Creating a class diagram is an exercise in clarity. It forces you to think about how objects interact before you write a single line of code. By following these five rules, you create a foundation that supports growth.
Focus on simplicity. If a diagram looks complicated, the design likely is too. Strive for a visual representation that any developer on the team can understand within minutes. This clarity translates to better software, fewer errors, and a more maintainable codebase. The effort spent on clean diagrams pays dividends in the form of reduced technical debt and faster development cycles.
Remember that tools are aids, not solutions. The value lies in the thinking process behind the lines. Apply these principles consistently, and your architecture will stand the test of time.